|
<< Click to Display Table of Contents >> ActiveX Variables Inputs |
  
|
|
<< Click to Display Table of Contents >> ActiveX Variables Inputs |
|
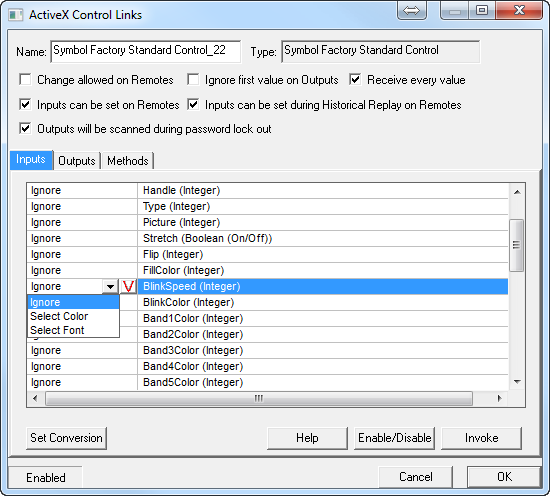
An Input is an input into the Control (SpecView setting a value into it).
Select the control, then press ALT-X to display the ActiveX Control Links box & click the Inputs tab:
To assign an ActiveX Control's Inputs to SpecView variables it is necessary to have first throughly read & understood the Control's documentation supplied by the author of the control.
It is possible to assign one of four kinds of input:
1. Constant values: To set a parameter to a constant value, such as BlinkMode=1 to turn on blinking, replace the word 'Ignore' with '1'.
Note that to assign a constant that is the same as a SpecView variable or parameter it is necessary to enclose it in double-quotes. Otherwise SpecView will substitute the value of the variable rather than just sending its name in.
For example: SpecView.Number1 sends the value of Number1 to the control
whereas, 'SpecView.Number1' sends the string ' SpecView.Number1' to the control.
2. SpecView variables or Instrument parameters: Click the required parameter on the Input tab then click the Variables List button:

& select the instrument or SpecView User variable to link it to.
When choosing a variable from the Variables List there are checkboxes to allow the type of variables to be changed:
- Do not convert
- Color
- Font
- Date
- Time
- Number with decimals
- Integer (which can be Signed or Unsigned)
- String
- Display format - This is used only when converting a number into a String to specify the number of decimal places or whether scientific notation is required.
However, it is always preferable to use a variable which is itself of the correct type.
Note that it is sometimes possible for an input to a control to be split across more than one input parameter. For example, the Time could be split into 3 separate parameters of hours, minutes & seconds. However, in this case whenever one of the parameters changes then all 3 will be sent by SpecView to the Control, but the other 'parts' of the parameter may not yet have been updated.
3. Colors: Choose 'Select Color' and select the required color. The color will be shown in notation, for example: 'Color_65280', not as the name of the color, for example: 'Green'.
4. Fonts: Choose 'Select Font' and select the required font. The font will be shown in notation, for example: ' Font_Arial,10,0,400,0', not as the name of the font, for example: 'Arial Regular 10'.
Note that If the name (in notation form) of a color or font needs to be assigned to a string then the name will need to be enclosed in double-quotes, otherwise SpecView will substitute the actual color or font in place of its name.
Enable/Disable: This button will enable or disable the selected item, or if none are selected then it will enable/disable the entire control.
All controls can be enabled/disabled using the File->Preferences ActiveX tab.
Invoke: The Invoke button can be used to read an Input to test it.
See also:
ActiveX - Steps to add an ActiveX Control