|
<< Click to Display Table of Contents >> Passwords GDW Setup |
  
|
|
<< Click to Display Table of Contents >> Passwords GDW Setup |
|

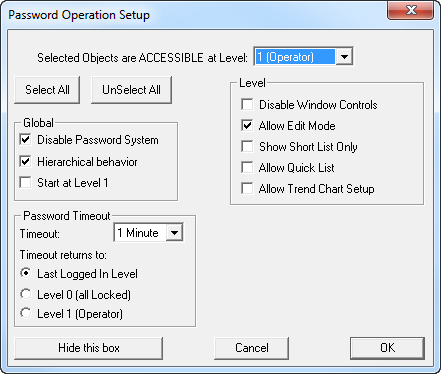
Selected Object Access Levels
SpecView provides (up to) 5 levels of log-in access:
-Level 0 is the default (unless 'Start at Level 1' is checked) - where only the Password menu command or a Login button is accessible
-Level 1 (Operator) is the first level - typically only minimal access is given to Level 1 users
-Level 2 would typically have more access than level 1
-Level 3 would typically have more access than levels 1 and 2
-Level 4 (Configuration) would have the most access, but not necessarily access to everything - otherwise they could just use level 5
When a user is logged in at Level 5 everything on all GDWs is accessible.
Be aware that just because a variable has been marked as accessible at a level on one GDW does NOT mean it is accessible on another GDW.
Level 0 and Level 5 are not included in the drop-down-list because '0' is no access, and '5' always has access to everything.
Select All / UnSelect All Buttons
These buttons provide a quick way to Select / UnSelect all the objects on a GDW.
The Select All button is useful to highlight ALL the objects which the user may need access too, and then click (to deselect) the ones that you don't want this level to have access to.
Global - These apply to ALL levels of user:
Disable Password System (Default = On) - this applies to ALL Levels
When checked the password system is not active and the system is unlocked at all times.
This is useful during project development when switching frequently between Edit Mode and Runtime Mode.
Hierarchical Behavior - this applies to ALL Levels
When checked each level behaves in a hierarchical way; i.e. When an object is marked as accessible at level 1, it is automatically accessible at levels 2, 3 and 4.
NOTE: The following example should be studied in order to understand how this behavior could be confusing.
-An object, say Zone1.Setpoint, is marked as accessible at Level 1 (Operator)
-It is therefore accessible at all higher levels
-The user switches to Level 4 (Configuration)
-The user clicks by mistake on Zone1.Setpoint, de-selecting it
-Seeing the mistake, the user clicks again on Zone1.Setpoint to re-select it….
However, because de-selecting it LOCKED it at Level 4 AND ALL LEVELS BELOW, re-selecting it only made it accessible at Level 4 - it is STILL LOCKED AT LEVEL 1. You MUST return to Level 1 and re-select it at that level.
Start at Level 1
This allows Level 1 users access without them having to login. This is commonly used when there are many operators who need to be able to walk-up to the system and click on a few things quickly without having to login first. In this case Level 1 users should only be given minimal access - and should need to login at a higher level to do anything that needs to be traceable. Password login/logout events can be recorded in the Event Log.
Password Timeout - These apply to ALL levels of user:
Timeout
Select a time for the inactivity timeout.
Inactivity is defined as not accessing a variable. Moving the mouse is not activity.
The time left on the timeout is shown in the status bar
It is important to set the Password Timeout to the shortest possible time, so the user is automatically logged out after the briefest possible period of inactivity.
Timeout Returns To
Select the required action:
Last Logged In Level - this goes back to the level of the last user logged in, if their level was less than the current level, otherwise it goes back to Level 0
Level 0 (all Locked) - this is the most secure choice
Level 1 (Operator) - this is similar to 'Start at Level 1' but it is necessary to login at Level 1 initially when SpecView first goes online.
Level - These only apply to the level of user selected:
Disable Window Controls - this applies to the current Level selected
When checked the Window's menus are hidden and the maximize/minimize controls are disabled for this level of user. In addition to this, the following Windows keys will also be disabled:
Ctrl-Esc
Alt-Tab
'Windows' Key (which is positioned on the keyboard between the Ctrl and Alt keys) and on Windows 95/98/Me: Ctrl-Alt-Del is also disabled. However, on Win NT, Win 2000, Win XP, Ctrl-Alt-Del cannot be disabled.
It is possible to just allow windows to be minimized by using File->Preferences - Display tab - Allow Minimize.
Note: The Maximize window control will continue to be available for use. To avoid this being accidentally clicked use Full Screen Mode.
Allow Edit Mode - this applies to the current Level selected
When NOT checked the Edit Mode menu command is not available on the File menu to this level of user.
Short List Only - this applies to the current Level selected
-When checked the parameter button on Instrument Views will be restricted to the short list
-The Short Param List menu command on the Options menu will also be disabled
This will also affect the contents of the Parameter list which is displayed by the button (or Strategy Controller) action 'Parameters: Show Full Parameter List'.
NOTE: If a variable is listed in the short list, and the user has access to the Parameter list (either via the Instrument view's button, or via another button) then they will be able to change the value of that variable.
Allow Quick List
This allows this level of user to access the Quick List from Runtime Mode.
Allow Trend Chart Setup
This allows this level of user to access the Trend Chart Setup box from Runtime Mode.