|
<< Click to Display Table of Contents >> Web Server - Setup |
  
|
|
<< Click to Display Table of Contents >> Web Server - Setup |
|
Please read through the Web Server section to learn more about SpecView's Web Server features.
Follow the steps below to set up the Web Server on SpecView.
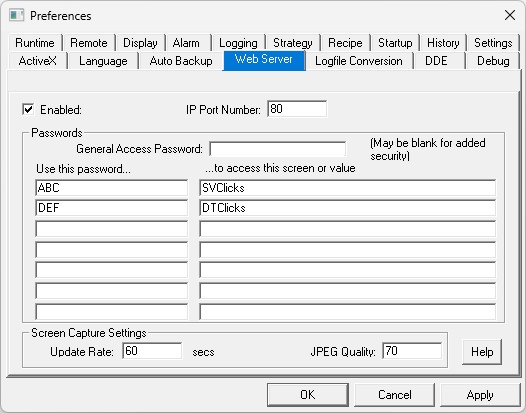
| 1. | Access SpecView Preferences by selecting File > Preferences or using the Ctrl + E keyboard shortcut within the SpecView project. |
| 2. | Navigate to the Web Server tab in the Preferences dialog box. |
| 3. | Select the check box adjacent to "Enable the Web Server". |
| 4. | Specify an appropriate port number in the IP Port Number field. |
The default setting for the Web Server is port 80.
Users will need to confirm with their company’s IT department to ensure that this does not conflict with any other applications.
Read Web Server - Port 80 Setup for further details.
| 5. | The General Access password is for the Web Values feature and is not required for the Web Server. |
For details on the Web Values feature, consult your SpecView representative.
| 6. | The update rate is by default 60 seconds. |
SpecView will update a new screenshot every 60 seconds.
Users can update this if they need SpecView to update images faster.
It is recommended to leave the update rate at the default value of 60 to minimize the load on the SpecView Web Server.
If the update rate needs to be increased, please contact a SpecView representative first to avoid mismatched refreshing rates between the Web Server and the remote browser.
| 7. | The JPEG quality is at the default of 70. |
The JPEG quality ranges from 0 – 100.
0 being low quality with a high amount of JPEG compression and 100 being high quality with little JPEG compression.
It is recommended to leave the JPEG quality at the default value of 70 as this is a good compromise between speed of access and quality of image.
| 8. | Click on Apply. |
| 9. | Click on OK. |
The Web Server is now active – and will remain active regardless of which SpecView project is opened.
If SpecView is shut down, the Web Server will stop.

As of SpecView 3.1.267, users have the ability to interact with the Web Server in a limited capacity.
When a user clicks on an area in the screenshot, the click will be registered in the same area on the PC hosting the Web Server.
For example, the user clicks on a button in the screenshot.
That click will be registered on the PC hosting the Web Server and the button action will be triggered.
The steps mentioned in Web Server - Setup still apply.
Implement the following steps before Step 8.
| 1. | Enter the command “SVClicks” in a field under “to access this screen or value”. |
| 2. | Enter an appropriate password for “SVClicks” in the same row but under the “Use this password” column. |
| 3. | Repeat Steps 1 and 2 for the command “DTClicks” to interact with the entire desktop screen. |
The command “SVClicks” will present the user with a screenshot of just the area of the SpecView window.
It will not show any surrounding screen contents.
The command “DTClicks” will present the user with a screenshot of the entire PC screen, including the Taskbar.
This enables users to interact with the desktop and any other program running on the computer, whereas “SVClicks” only allows access to the SpecView screen area.
It is strongly recommended to be extremely careful when utilizing "DTClicks" as this feature does enable users to access and control any programs and data on the PC.
(Step 8-9 from above) Click on Apply and then click on OK.
The Web Server is now active and ready to be interacted with.